How to Sanitize Your Laundry After Someone Has Been Sick: Complete Guide
Watching a family member recover from illness brings relief, but then reality hits—piles of potentially contaminated bedding, towels, and clothing stare back at you from the hamper. You want to protect your household from reinfection, but figuring out the right sanitization approach feels overwhelming when you’re already exhausted from caregiving.
This comprehensive guide transforms the complex science of pathogen elimination into clear, actionable steps that work with your existing laundry routine. We’ve researched the most effective sanitization methods and broken them down into simple processes that require no special equipment—just strategic use of temperature, timing, and the right products. You’ll have confidence knowing your family’s health is protected while preserving your favorite fabrics.
Contents
- At a Glance: The Best Solutions
- The Science Made Simple: Why This Problem Happens
- 1. The Hot Water and High Heat Method
- 2. The Laundry Sanitizer Addition Method
- 3. The Bleach-based Sanitization Method
- 4. The Delicate Item Sanitization Method
- 5. The Professional-grade Disinfection Method
- 6. The Item-specific Sanitization Method
- Common Mistakes to Avoid
- Frequently Asked Questions
- Final Words
At a Glance: The Best Solutions
When someone in your home has been sick, you need a clear game plan to sanitize laundry after illness effectively. Different fabric types and contamination levels require specific approaches, and getting this wrong can leave harmful pathogens lingering on your clothes and bedding.
The table below shows our tested methods for each laundry category. These combinations of temperature, sanitizing agents, and drying techniques will help you remove germs from clothes while protecting your fabrics.
| Laundry Type | Water Temperature | Sanitizing Method | Drying Method | Time Required |
|---|---|---|---|---|
| Bedding & Towels | Hot (140°F+) | Detergent + Laundry Sanitizer | High Heat Dryer | 90 minutes |
| Regular Clothing | Warm to Hot | Detergent + Bleach Alternative | High Heat Dryer | 75 minutes |
| Delicate Items | Cool to Warm | Gentle Detergent + Sanitizer | Air Dry + UV Sunlight | 4-6 hours |
| Children’s Items | Hot (Safe for Fabric) | Hypoallergenic Sanitizer | High Heat Dryer | 85 minutes |
Heat remains your most powerful ally when you need to sanitize laundry after sick person has used these items. The combination of hot water above 140°F and high-heat drying creates an environment where most pathogens cannot survive.
For items that can’t handle extreme heat, UV sunlight becomes a natural disinfectant. Six hours of direct sunlight exposure can eliminate many viruses and bacteria that survive cooler washing temperatures.
Time requirements include both washing and drying cycles. Children’s items often need extra attention because little ones tend to put fabric items near their faces and mouths, making thorough sanitization critical for preventing reinfection.
The Science Made Simple: Why This Problem Happens
When someone gets sick, their clothes and bedding become repositories for invisible threats. Viruses, bacteria, and other pathogens cling to fabric fibers with surprising tenacity, creating a hidden battleground in your laundry basket.
Think of fabric as a cozy hotel for germs. The microscopic nooks and crannies between fibers provide perfect hiding spots, while body oils and dead skin cells offer a buffet of nutrients.
How Pathogens Survive on Fabric
Pathogens don’t just sit passively on your clothes-they actively adapt to survive. Many viruses and bacteria can remain viable on fabric surfaces for days or even weeks, depending on conditions like humidity and temperature.
Cotton and polyester blends are particularly hospitable to germs because their porous structure traps moisture and organic matter. Natural fibers like wool can harbor pathogens even longer due to their complex protein structures.
Virus Survival Times on Common Fabrics
Different viruses have varying lifespans on textiles. Respiratory viruses like influenza can survive on fabric for 8-12 hours, while more resilient viruses may persist for up to 5 days.
Synthetic fabrics generally harbor viruses longer than natural ones. The smooth surface of polyester allows viruses to remain active longer compared to the rougher texture of cotton, which can physically damage viral particles over time.
Bacteria and Their Laundry Lifespan
Bacteria are the marathon runners of the pathogen world. Common illness-causing bacteria can survive on clothing for weeks, multiplying rapidly in warm, moist conditions.
Staphylococcus and streptococcus bacteria are particularly stubborn, often surviving multiple wash cycles if proper sanitization methods aren’t used. They thrive in the protective biofilms that form within fabric fibers.
Why Regular Washing Isn’t Always Enough
Your standard laundry routine might remove visible dirt, but it often leaves microscopic invaders behind. Regular detergent and lukewarm water can reduce pathogen loads but rarely eliminate them completely.
The problem lies in the survival strategies of these microscopic organisms. They’ve evolved to withstand environmental stresses, including the mild conditions of typical home washing.
Temperature Limitations in Standard Cycles
Most home washing machines use water temperatures between 80-90°F for regular cycles. While comfortable for preserving fabric colors and preventing shrinkage, these temperatures fall well short of the 140°F needed to reliably kill most pathogens.
Cold water washing, while energy-efficient and gentle on fabrics, provides virtually no sanitization benefit. Germs remain viable and can even multiply during the wash cycle if conditions are right.
How Detergent Alone May Fall Short
Standard laundry detergents excel at removing dirt and oils but aren’t formulated to kill pathogens. Detergent works by loosening soil from fibers, but many viruses and bacteria simply reattach to the fabric once the wash water drains.
Surfactants in detergent can actually help some pathogens survive by creating protective micelles around them. This is why you need specific sanitizing agents beyond regular detergent when dealing with illness-contaminated laundry.

1. The Hot Water and High Heat Method
This tried-and-true approach harnesses the power of temperature to destroy pathogens. Heat disrupts the protein structures that viruses and bacteria need to survive, making this method highly effective for most contaminated items.
The combination of hot water washing and high-heat drying creates a one-two punch that few pathogens can withstand. Think of it as giving germs a fever they can’t recover from.
What You’ll Need
- Regular laundry detergent
- Washing machine capable of 140°F+ water temperature
- High-heat dryer setting
- Disposable gloves for handling contaminated items
- Separate laundry basket for sick person’s items
- Disinfectant for cleaning washer after use
Step-by-step Process
This method requires careful attention to timing and temperature to maximize pathogen elimination. Each step builds on the previous one to create an environment hostile to germs while protecting your fabrics.
Preparing the Contaminated Items
- Put on disposable gloves before handling any contaminated laundry
- Sort items by fabric type and color, keeping sick person’s items completely separate
- Check care labels to ensure items can withstand hot water and high heat
- Pre-treat any visible stains with detergent or stain remover
- Shake out items outdoors if possible to remove loose debris
Loading the Washer Properly
- Fill the washer only to 2/3 capacity to allow proper water circulation
- Add contaminated items first, then pour detergent directly over them
- Avoid overloading-items need space to move freely for effective sanitization
- Close the lid immediately to prevent airborne particles from escaping
- Remove and dispose of gloves properly before touching washer controls
Selecting the Right Cycle and Temperature
- Choose the hottest water temperature safe for the fabric (minimum 140°F)
- Select a normal or heavy-duty cycle for extended wash time
- Add an extra rinse cycle to remove any remaining pathogens
- Use the highest water level setting for maximum dilution
- Allow the full cycle to complete without interruption
Drying for Maximum Sanitization
- Transfer items to the dryer immediately after washing
- Select the highest heat setting safe for the fabric type
- Run the dryer for at least 45 minutes, even if items seem dry
- Clean the lint filter before and after to maintain proper airflow
- Let items cool completely before removing to avoid recontamination
Best Fabrics for This Method
Cotton, linen, and cotton blends respond beautifully to hot water sanitization. These natural fibers actually become more sanitized with repeated hot water washing, as the high temperatures help break down any remaining organic matter that could harbor germs.
Most synthetic blends can also handle this method well. Polyester-cotton combinations are particularly suitable, as the polyester adds durability while the cotton provides absorbency for thorough cleaning.
Avoid this method for wool, silk, or items with special finishes like waterproof coatings. These materials require gentler approaches to prevent damage while still achieving sanitization. To protect these delicate fabrics from potential harm, consider using natural methods that deter moths. Utilizing essential oils or cedar can be effective in naturally protecting wool and cashmere from clothes moths.
Also See: The Top 10 Vitamins and Foods for Faster Hair Growth
2. The Laundry Sanitizer Addition Method
Commercial laundry sanitizers offer a targeted approach to pathogen elimination. These specialized products work at lower temperatures than the heat method, making them perfect for items that can’t withstand hot water washing.
Unlike bleach, which can damage colors and fabrics, modern sanitizers use advanced chemistry to kill germs while preserving your clothes. They’re formulated specifically for home laundry use.
Understanding Epa-approved Sanitizers
Look for products with EPA registration numbers on their labels. These sanitizers have undergone rigorous testing to prove they can eliminate 99.9% of common household germs, including viruses and bacteria that cause illness.
The most effective sanitizers contain quaternary ammonium compounds or hydrogen peroxide-based formulations. These ingredients penetrate fabric fibers to reach hidden pathogens that regular detergent might miss.
How to Use Sanitizers Effectively
Timing and measurement are crucial for sanitizer effectiveness. Adding too little sanitizer won’t eliminate all pathogens, while using too much can leave residues that irritate sensitive skin.
Most sanitizers work best in warm water, though some formulations are effective in cool water. Always check the product label for specific temperature requirements.
Timing the Addition During the Wash Cycle
- Add sanitizer to the fabric softener dispenser for automatic release during rinse
- For manual addition, wait until the first rinse cycle begins
- Pour sanitizer into the agitator well or directly into the wash water
- Allow at least 5 minutes of contact time for pathogen elimination
- Complete the full wash and rinse cycle without interruption
Measuring the Correct Amount
- Use the measuring cap provided with your sanitizer product
- Follow label directions based on load size and soil level
- Increase amount by 25% for heavily contaminated items
- Never exceed maximum recommended dosage to avoid residue buildup
- Store measuring tools separately from food preparation items
Compatible Fabric Types
Most laundry sanitizers work safely on cotton, polyester, and blended fabrics. They’re particularly effective on synthetic materials that might harbor pathogens in their smooth fiber structure.
Athletic wear and moisture-wicking fabrics benefit greatly from sanitizer treatment. These technical fabrics can trap bacteria in their specialized fiber construction, making sanitizers essential for complete cleanliness.
Test sanitizers on a hidden area of delicate fabrics before full treatment. While most are gentle, some sensitive dyes or finishes might react to the active ingredients, especially when removing dye-transfer stains from clothes.
Natural Sanitizer Alternatives
White vinegar serves as an effective natural sanitizer when used properly. Add one cup of white vinegar to the rinse cycle to lower pH levels and create an environment hostile to most pathogens. using vinegar in your washing machine not only helps with sanitization but can also enhance the freshness of your laundry. Regularly adding vinegar can reduce odors and break down residue, making it a valuable addition to your laundry routine.
Pine oil-based products also provide natural sanitization benefits. Look for products containing at least 80% pine oil for effective pathogen elimination, though these work best on sturdy fabrics like towels and bed linens.
Tea tree oil can be added to wash water for its antimicrobial properties, but use sparingly-just a few drops per load. Too much can leave a strong scent and potentially irritate sensitive skin.
3. The Bleach-based Sanitization Method
When to Use Chlorine Bleach
Reach for chlorine bleach when you need strong germ reduction on sturdy, white, colorfast fabrics like cotton towels, sheets, and socks. It supports sanitizing laundry after illness by breaking down organic messes and inactivating many microbes when used as directed.
Use it for wash loads from a sick person that can tolerate it: bathroom towels, bedding, and white undershirts. Skip it for anything labeled “no chlorine,” stretch fabrics, or pieces with delicate dyes.
Oxygen Bleach for Color-safe Sanitizing
Oxygen bleach (sodium percarbonate) brightens and deodorizes while being gentler on colors and elastics. It boosts your detergent to remove germs from clothes by removing the soils they cling to. This gentle yet effective agent can also play a role in naturally brightening colored clothes. Using natural methods to maintain the vibrancy of fabrics not only enhances their appearance but also extends their lifespan.
Use oxygen bleach when you need to wash clothes after sickness but can’t risk color loss or fiber damage. It performs best in warm to hot water (104–140°F / 40–60°C), so check the care label first.
Step-by-step Bleach Sanitization
Pre-Treatment for Heavily Soiled Items
- Protect yourself: put on gloves and, if splashing is likely, eye protection.
- Remove solids: scrape into a lined trash bag and blot-not rub-stains with paper towels.
- Cold flush: rinse the stained area under cold running water to lift proteins before they set.
- Targeted pre-soak (whites only): in a bucket, mix 1/4 cup chlorine bleach per gallon (4 L) of water, submerge for 5 minutes, then transfer to the washer.
- For colors: pre-soak in oxygen bleach solution per label directions to aid sanitizing without fading.
Proper Dilution Ratios
- Standard top-loader (3.2–4.0 cu ft): add 1/2 cup (120 mL) of regular 5–6% chlorine bleach to the dispenser or wash water after it fills.
- High-efficiency (HE) washer: add 1/3 cup (80 mL) to the bleach dispenser; the machine meters it safely.
- Small loads: scale bleach to the load size (about 1 tablespoon per gallon of wash water if measuring by sink/bucket).
- Oxygen bleach soak: typical is 1 scoop per gallon (4 L) of warm water; soak 30–60 minutes, then wash.
- Always add bleach to water, never directly onto fabric, and follow the product label for your exact washer and fabric.
Safety Precautions While Handling
- Ventilate well; open a window or run a fan.
- Never mix bleach with ammonia, vinegar, acids, hydrogen peroxide, or alcohol-based products.
- Use the machine’s bleach dispenser or dilute in water first; undiluted bleach can weaken fibers and cause uneven light spots.
- Rinse items thoroughly; consider an extra rinse when you sanitize laundry sick loads.
- Store bleach in a cool, dark place and replace bottles older than one year; potency drops over time.
Items That Should Never Meet Bleach
- Wool, silk, cashmere, mohair, or any protein fiber
- Spandex/Elastane/Lycra blends and stretchy athletic wear
- Leather, suede, and down-filled items
- Items labeled flame-resistant (e.g., some kids’ sleepwear)
- Waterproof/PU-backed fabrics, rubber-backed mats
- Non–colorfast dyes, dark indigo denim, tie-dye, or prints
- Pieces with metallic threads, sequins, adhesives, or screen prints
- Microfiber cloths designated “no bleach” by the maker

4. The Delicate Item Sanitization Method
Identifying Items That Need Special Care
Delicates include silk blouses, wool and cashmere knits, lace, rayon/viscose, lingerie, and embellished garments. They can still be part of a plan to sanitize laundry after illness—you just need gentler tools. When it comes to caring for delicate fabrics like silk and wool, hand washing is often the best method to preserve their quality. This gentle technique helps avoid damage while ensuring your favorite items stay clean and fresh.
When tags say “hand wash,” “dry clean,” or “no chlorine,” skip harsh chemicals and high heat. Focus on soil removal, fabric-safe additives, and careful drying.
Silk and Wool Considerations
These protein fibers dislike high pH, heat, and agitation. Choose a pH‑neutral, wool/silk-safe detergent and cool to lukewarm water.
Blot stains, don’t wring, and reshape flat to dry to keep fibers strong while you remove germs from clothes safely. Additionally, using homemade stain removers can enhance the cleaning process. Many effective recipes utilize common household items that help tackle stubborn stains without damaging your fabrics.
Items with Special Finishes
Think water-repellent jackets (DWR), pleated skirts, coated fabrics, or fire-resistant finishes. Bleach and high heat can strip or distort these treatments.
Use gentle cycles or hand-wash, then air-dry; reapply protective finishes later if the manufacturer recommends it.
Hand-washing Techniques for Sanitization
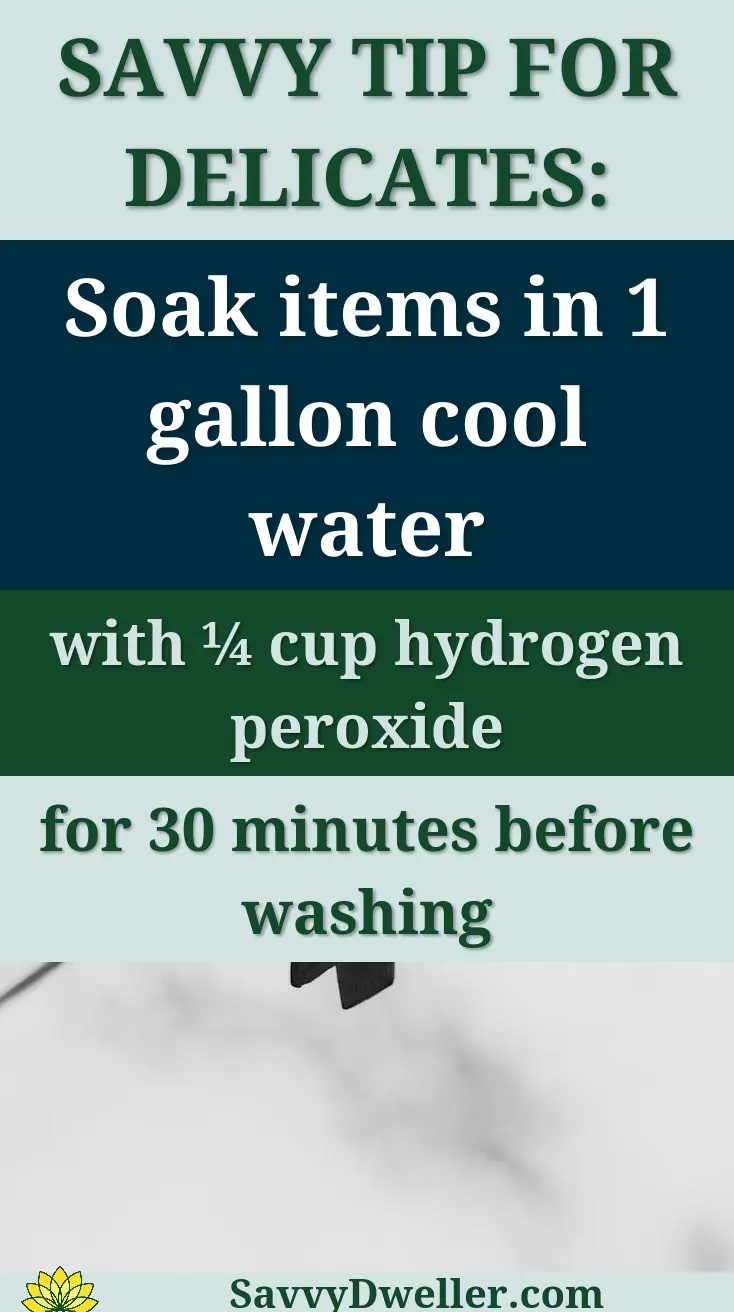
- Set up a clean basin with 2–3 gallons (8–12 L) of cool to warm water (77–95°F / 25–35°C).
- Add a measured dose of gentle detergent; if using a fabric-safe laundry sanitizer labeled for hand-washing, dose exactly per the label.
- Submerge and swish lightly for 2–3 minutes; focus on cuffs, collars, and underarms where microbes collect.
- Soak 10–15 minutes to aid germ reduction while soils lift. This helps when you wash clothes after sickness without stressing fibers.
- Rinse twice in clean water until suds are gone; press water out against the basin-don’t twist.
- Roll in a clean towel to remove more moisture before drying.
Air-drying With UV Exposure Benefits
Sunlight supports sanitizing by adding UV and heat-use it when safe for the fabric and dyes. Midday sun for 30–60 minutes per side on a clean rack or line works well.
If fading is a risk, dry in the shade with strong airflow or near a sunny window to gently sanitize clothes post illness. Always dry completely; dampness invites odors back.
Steam Treatment As an Alternative
Steam helps when you need to disinfect clothing after illness but can’t launder immediately-think suits, structured dresses, hats. It’s a supplement, not a replacement for washing.
- Hang the item; fill your garment steamer with clean water.
- Hold the nozzle 1–2 inches (2.5–5 cm) away and move slowly, spending 10–15 seconds per area.
- Let items dry fully on a hanger. For irons with steam, use a press cloth on silk and keep the iron moving.
5. The Professional-grade Disinfection Method
When to Consider Heavy-duty Sanitization
Use this route when there’s significant vomit/diarrhea contamination, repeated sickness in the home, or someone with high vulnerability. It also fits healthcare work clothes or large loads from shared bathrooms.
If you’re asking how to disinfect laundry after someone sick and regular steps feel inadequate, upgrade the process for added assurance.
Commercial-strength Products for Home Use
Look for EPA-registered laundry disinfectants with clear “laundry” directions and dwell times. These often use quaternary ammonium compounds or peroxide chemistry compatible with many colors.
Chlorine bleach remains an option for whites, while oxygen bleach supports soil removal for colors. Choose products that explicitly state “sanitizes” or “disinfects laundry” and follow the label exactly.
Multi-step Deep Sanitization Process
Pre-Sorting by Contamination Level
- High contamination: items with visible soil, bathroom towels, bedding from the sick person.
- Moderate: clothing worn during illness with no visible soil.
- Low: shared household textiles with casual contact.
- Bag and stage loads separately so you don’t cross-contaminate while you wash laundry after someone is sick.
Double-Wash Technique
- First wash: warm water, heavy-duty detergent, and an extra rinse to remove organic soils. This step improves the effectiveness of what follows.
- Second wash: hot water the fabric can tolerate plus an EPA-registered laundry disinfectant or chlorine bleach (for whites) per label dose and contact time.
- HE tip: select “sanitize” or “allergy” cycle if available to extend time and heat, aiding disinfect laundry after illness.
Extended High-Heat Drying
- Dry on high heat until fully dry-no cool damp spots. Towels/linens often need 60–75 minutes; clothing 45–60 minutes, depending on fabric and load size.
- Complete dryness matters more than a specific number-heat plus time aids how to get germs out of laundry.
- Let items rest at room temperature before storing to ensure residual moisture dissipates.
Post-wash Equipment Sanitization
- Washer: run a tub-clean or hottest cycle empty with chlorine bleach (1 cup in top-loaders, 1/2 cup in HE) to sanitize laundry after sick person loads.
- Wipe the door gasket, drum, and detergent drawer with a disinfecting wipe or a diluted bleach solution; let air-dry.
- Dryer: wash the lint filter with soap and warm water, dry it, then wipe the drum and door. Run the dryer empty on high for 10 minutes.
- Leave washer and dryer doors open between uses to reduce moisture and odors.
Used together, these methods offer the best way to wash clothes after illness while protecting fabrics. They help you sanitize clothes after sick episodes, reduce recontamination, and keep your laundry routine calm and controlled.
6. The Item-specific Sanitization Method
Bedding and Linens
Pillows and Comforters
Pillows and comforters trap moisture and breath, so give them a more thorough approach when you sanitize laundry after illness. Check care labels first; down and memory foam need different handling than polyester fills. Regular cleaning not only helps maintain hygiene but also prolongs the life of your bedding items. To truly refresh and restore your pillows, learn the ultimate guide to washing and whitening old pillows for the best results.
- Mild detergent
- EPA-registered laundry sanitizer (fabric-safe)
- Oxygen bleach (color-safe) for colors; chlorine bleach only for white cotton without elastic or down
- Large-capacity washer, dryer balls or clean tennis balls
- Garment steamer (for non-washable foam cores)
- Pre-check: Remove covers/shams and wash them separately on hot with sanitizer. For memory foam cores, do not machine wash; spot clean and use a garment steamer in slow passes to help remove germs from clothes and surfaces.
- Load loosely: Place pillow/comforter in a large washer with room to move. Overstuffing reduces water flow and heat contact.
- Wash cycle: Use warm to hot water the fabric tolerates (up to 140°F/60°C for cotton/poly), heavy-duty cycle, detergent, and the labeled dose of sanitizer.
- Rinse: Add an extra rinse to clear residues that can trap odors.
- Dry: Tumble on medium to high heat until fully dry, adding dryer balls to re-fluff. For down, use low-to-medium heat longer to protect feathers, then air in sunlight for 1 hour.
Mattress Protectors and Sheets
These are high-contact items, so they’re your front line when you wash clothes after sickness. Waterproof protectors need heat, but not so high that the membrane warps.
- Detergent
- Laundry sanitizer
- Oxygen bleach for colors; chlorine bleach only for white cotton
- Soft brush for stains
- Pre-treat: Brush off debris. Pre-soak heavily soiled areas in warm water with oxygen bleach for 30 minutes to aid disinfect laundry.
- Wash: Run a hot cycle (up to 140°F if label allows) with detergent and sanitizer. Use a normal or heavy-duty cycle for sheets; gentle for waterproof protectors.
- Rinse: Add an extra rinse for protectors to remove soap that can film the membrane.
- Dry: Sheets-high heat until crisp dry. Protectors-tumble low-to-medium heat, then air-dry flat to finish. Do not fold or store until completely dry to reduce moisture-loving germs.
Personal Clothing Items
Undergarments and Socks
These pieces need the most heat and chemistry you can safely use when you sanitize clothes post illness. A mesh bag keeps pairs together and improves agitation.
- Detergent
- EPA-registered laundry sanitizer
- Oxygen bleach (color-safe) or chlorine bleach for white cotton only
- Mesh laundry bags
- Pre-sort: Keep these separate from regular laundry to sanitize laundry sick without cross-spread.
- Pre-soak: Use warm-hot water (104–140°F / 40–60°C) with oxygen bleach for 30 minutes for fabrics that allow it.
- Wash: Bag delicates. Choose hot if the label permits; otherwise warm with sanitizer. Skip fabric softener-it can lock in residues.
- Dry: High heat until fully dry. Heat plus time is the best way to wash clothes after illness when fabric allows.
Outerwear and Jackets
Focus on high-touch zones: collars, cuffs, zippers, and sleeve ends. Many jackets handle warm water and sanitizer; down and waterproof shells need gentler heat.
- Mild detergent or technical gear wash (for waterproof membranes)
- Laundry sanitizer (fabric-safe)
- Oxygen bleach for color-safe pieces (avoid on DWR-coated shells)
- Soft brush; dryer balls
- Prep: Detach hoods/liners; close zippers and Velcro. Pre-brush cuffs and collars.
- Wash: Use warm water with sanitizer on normal for cotton/poly; gentle for down or waterproof shells with a tech detergent.
- Rinse: Extra rinse to clear soaps that can affect repellency.
- Dry: Cotton/poly-medium to high heat. Down-low heat with dryer balls until fully lofted. Waterproof shells-low heat or air-dry, then brief low tumble to reactivate finish.
- Boost: If heat is limited, use a garment steamer on high-touch areas to support how to sanitize clothes after sickness.
Household Textiles
Kitchen Towels and Dishcloths
These see raw food and frequent dampness, so treat them like a separate, hotter load when you disinfect laundry after illness. Do not mix them with clothing.
- Heavy-duty detergent
- Laundry sanitizer
- Chlorine bleach for white cotton only; oxygen bleach for colors
- Bucket for pre-soak
- Pre-soak: 20–30 minutes in hot water with oxygen bleach for colored towels; use a bleach-safe soak for whites.
- Wash: Hot cycle (140°F/60°C if safe) with detergent and sanitizer. Choose a longer, heavy-duty cycle.
- Rinse and dry: Extra rinse, then high heat until fully dry. Replace any fraying dishcloths-worn loops hold more residue.
Bathroom Towels and Bath Mats
Thick loops and rubber backings dry slowly, so extend the cycle and drying time when you sanitize laundry after sick person use. Keep mats and towels separate from clothes.
- Detergent
- Laundry sanitizer
- Oxygen bleach for colors; chlorine bleach for white cotton towels only
- Low-heat setting for rubber-backed mats
- Shake and sort: Remove hair/debris. Wash mats apart from towels.
- Wash: Towels-hot water with sanitizer; mats-warm water gentle cycle (protect rubber backing).
- Dry: Towels-high heat to bone-dry. Mats-low heat or air-dry flat to avoid cracking.
- Tip: Skip fabric softener; it reduces absorbency and can trap odors.
Children’s Items
Stuffed Animals and Soft Toys
Go gentle but thorough to remove germs from clothes and plush without warping shapes. Always check labels; many soft toys handle a warm, gentle wash.
- Hypoallergenic detergent
- Fabric-safe, fragrance-free sanitizer
- Mesh bag or pillowcase with ties
- Garment steamer for non-washable toys
- Prep: Place toy in a mesh bag; secure any ribbons or small parts. Remove batteries or electronic modules.
- Wash: Gentle cycle, warm water, hypoallergenic detergent, and sanitizer per label.
- Rinse and dry: Extra rinse, then low heat tumble with a towel to cushion, or air-dry in sunlight. Reshape while damp.
- Non-washable: Use a garment steamer in slow passes, then air out in a bright, dry spot.
School Uniforms and Play Clothes
Uniform fabrics can handle more heat than you think-check the tag, then use the warmest safe setting to disinfect clothing after illness. Turn items inside out to protect finishes and prints.
- Detergent
- Laundry sanitizer
- Oxygen bleach (color-safe)
- Steam iron (optional)
- Pre-treat: Spot clean cuffs, collars, and knees. Separate light and heavy soil.
- Wash: Warm to hot water if allowed, detergent plus sanitizer. For dark colors, use warm with oxygen bleach to support laundry sanitizing after sick.
- Dry: Medium to high heat per label. If heat-limited, press with a steam iron on high-touch zones as a post-wash boost.
- Store: Cool completely before placing in drawers to avoid trapping residual moisture.
Common Mistakes to Avoid
Overloading the Washing Machine
An overpacked drum blocks heat, chemistry, and agitation, which undercuts how to get germs out of laundry. Aim for a loosely filled drum-about two-thirds full.
- Run extra loads instead of cramming one.
- Use an extra rinse for bulky items.
- Choose a longer cycle for dense fabrics.
Using Insufficient Water Temperature
“Hot” on the dial may be only warm if your water heater is set low. This can blunt the best way to wash clothes after illness.
- Run the nearest sink hot for 30 seconds before starting the washer.
- Use a sanitize or allergen cycle when fabric allows.
- Add a fabric-safe sanitizer when heat must be reduced.
Mixing Contaminated Items With Regular Laundry
Combining loads spreads soils and reduces the effectiveness of how to disinfect laundry after someone sick. Keep a separate hamper for the sick person’s items.
- Launder contaminated loads first, while the memory is fresh.
- Wash your hamper liner or bag in the same hot cycle afterward.
Skipping the Pre-sort Process
Soil level and fabric type change what works. Sorting helps you sanitize laundry after sick more reliably. Proper sorting is crucial for maintaining the quality of your clothes and ensuring effective cleaning. A definitive guide to sorting laundry can help simplify this process and improve your laundry routine.
- Group by fabric (towels vs. delicates) and soil (light vs. heavy).
- Contain small items in mesh bags to avoid lost pieces and improve agitation.
Forgetting to Sanitize Laundry Equipment
Drums, gaskets, and detergent drawers hold residues that can re-seed clean loads. This step supports how to wash laundry after someone is sick.
- Run a washer clean/sanitize cycle with chlorine bleach or a washer cleaner.
- Wipe the door gasket, drawer, and lid with a disinfecting wipe; dry the drum.
- Clean the dryer lint trap and wipe the drum; sanitize baskets and folding surfaces.
Not Wearing Protective Gear During Handling
Gloves and a simple face covering reduce exposure while you handle soiled laundry. Always wash hands after removing gloves.
- Use disposable gloves or dedicated laundry gloves.
- Avoid touching your face; launder the clothes you wore during handling.
Reusing Towels or Bedding Too Soon
Damp fibers can re-harbor odors and microbes, especially after washing clothes after being sick. Give items full heat and full dry time.
- Ensure items are completely dry and cool before reuse or storage.
- During illness, rotate fresh towels daily and change pillowcases frequently.
Frequently Asked Questions
How Should I Handle and Store Contaminated Laundry Before Washing to Prevent Spread?
When dealing with laundry from someone who’s been sick, it’s crucial to minimize handling to reduce cross-contamination. Wear disposable gloves and avoid shaking the items, as this can disperse pathogens into the air. Store contaminated laundry in a dedicated, lined hamper or a plastic bag that can be sealed until you’re ready to wash. Ideally, wash these items separately from other laundry and as soon as possible to prevent pathogen survival.
Is It Safe to Use Shared Laundry Facilities When Sanitizing Sick Laundry?
Yes, but take extra precautions. Use a sanitizing laundry bag or a plastic bag to transport items to prevent exposing others. After loading the washer, wipe down all surfaces you touched with a disinfectant, such as the machine door and control panel. Choose a time when the facility is less busy to minimize contact, and consider using a laundry sanitizer additive to ensure thorough cleaning despite shared equipment.
What Are the Signs That My Laundry Has Been Properly Sanitized?
Properly sanitized laundry should look clean, smell fresh, and be free of any stains or odors that might indicate remaining contaminants. However, since pathogens are invisible, rely on the process: ensure you used the correct water temperature, sanitizer, and drying method as recommended. For added assurance, you can use laundry test strips or follow CDC guidelines for disinfecting textiles, which often involve heat or EPA-approved products.
Can I Sanitize Laundry for Individuals With Compromised Immune Systems Effectively?
Absolutely, but be extra vigilant. Use the hottest water safe for the fabric and an EPA-registered laundry sanitizer to kill a broader range of pathogens. Consider double-washing items or using a professional-grade method for high-risk situations. Always dry on high heat if possible, and avoid fabric softeners that can reduce sanitizer efficacy. Consult with a healthcare provider for specific recommendations based on the individual’s needs.
Final Words
Taking the time to properly sanitize your laundry after illness isn’t just about cleanliness-it’s about protecting your family’s health and preventing reinfection cycles. The methods we’ve covered here can reduce harmful pathogens by up to 99.9% when executed correctly. Remember, consistency matters more than perfection, so don’t stress if you can’t achieve every step flawlessly.
Start with the method that best matches your specific fabric types and available time, then build your confidence from there. Whether you choose the hot water approach for everyday items or the delicate sanitization method for special garments, you now have the knowledge to tackle post-illness laundry like a pro. Your future self will thank you for taking these preventive steps today.
Ready to transform your approach to household health and cleanliness? Check out Savvy Dwelling for more research-backed solutions that make your home safer and more comfortable for everyone who lives there.

