How to Unclog a Shower Head for Better Water Pressure
Standing under a weak, sputtering shower head that barely delivers enough water to rinse your hair? You’re dealing with mineral buildup that’s choking your water flow and turning your relaxing shower into a frustrating trickle. This common household problem affects millions of homes, especially in areas with hard water, and it only gets worse over time.
This guide breaks down five proven methods to restore your shower head’s full pressure using items you likely already have at home. We’ve tested these techniques extensively and will walk you through each step, from the simple vinegar soak that works for most clogs to the complete disassembly method for stubborn buildup. You’ll also learn the science behind why this happens and simple habits to prevent future clogs.
Contents
- At a Glance: The Best Solutions
- 1. The White Vinegar Soak Method
- 2. The CLR and Commercial Descaler Approach
- 3. The Manual Scrub and Poke Technique
- 4. The Complete Disassembly Method
- 5. The Baking Soda Power Paste Solution
- The Science Made Simple: Why This Problem Happens
- 5 Habits to Keep Clogs From Coming Back
- Frequently Asked Questions
- Final Words
At a Glance: The Best Solutions
Quick Solutions Comparison Table
| Method | Best For | Time Required | Effectiveness |
|---|---|---|---|
| White Vinegar Soak | General mineral buildup, removable or fixed heads | 30 min – overnight | High |
| CLR/Commercial Descaler | Severe lime or rust deposits | 15–30 minutes | Very high |
| Manual Scrub & Poke | Localized clogs in individual nozzles | 10–15 minutes | Moderate to high |
| Full Disassembly | Internal buildup or persistent low pressure | 30–60 minutes | Maximum |
| Baking Soda Paste | Stubborn surface grime or mixed deposits | 20–40 minutes | Moderate |
Signs Your Shower Head Needs Immediate Attention
If your morning shower feels more like a drizzle than a stream, it’s time to act. Common red flags include uneven spray patterns, sputtering water, or visible white crust around the nozzles.
A clogged showerhead doesn’t just ruin your shower experience-it can also signal worsening hard water issues in your plumbing. Ignoring it may lead to reduced efficiency, higher water bills, and even mold growth from lingering moisture.
What You’ll Need Before Getting Started
Gather these basics before you begin any unclogging method. Most are items you likely already have at home:
- White vinegar (distilled, 5% acidity)
- Baking soda
- CLR or another commercial descaler (optional)
- Plastic bag or bowl (for soaking)
- Rubber band or twist tie
- Old toothbrush or soft-bristle brush
- Paperclip, pin, or sewing needle
- Microfiber cloth or towel
- Gloves (especially when using commercial cleaners)
- Adjustable wrench (only if disassembling)
Having your tools ready makes how to unclog a shower head feel less like a chore and more like a quick win. Pick the method that matches your clog severity-and your patience level.
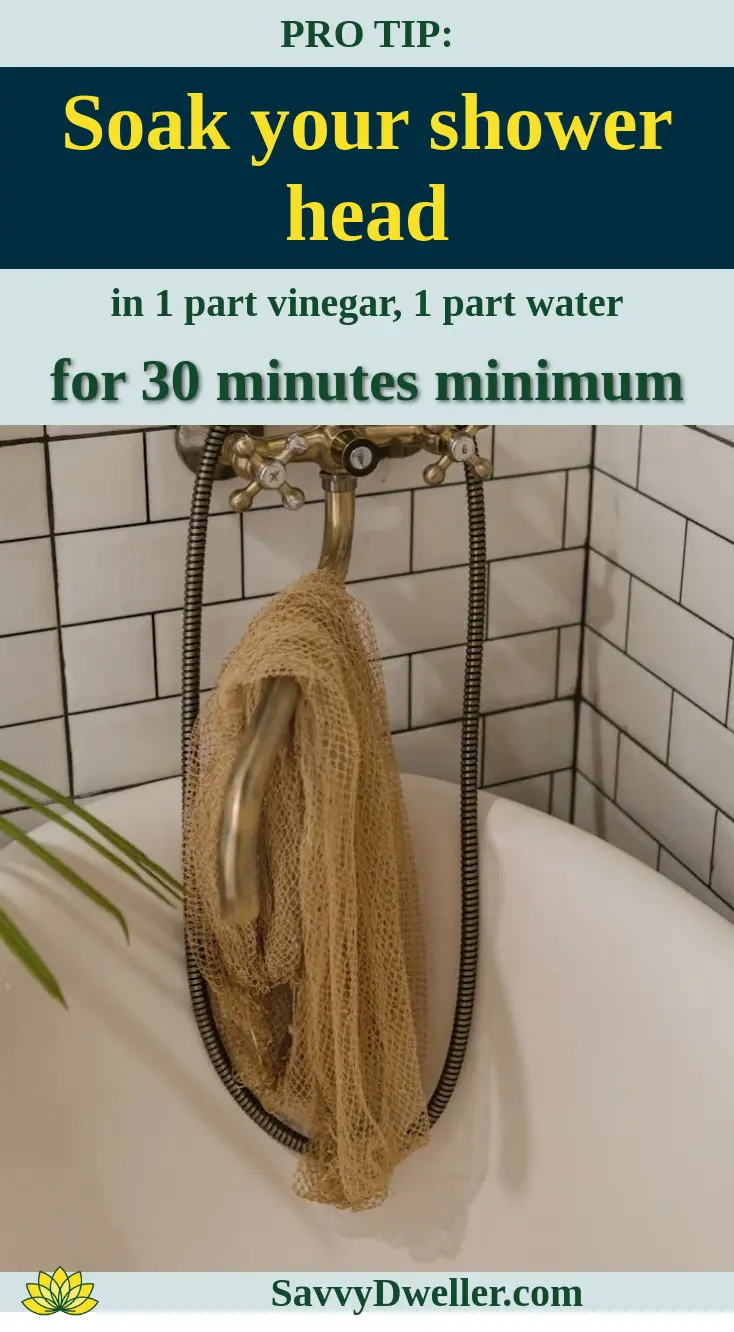
1. The White Vinegar Soak Method
Why This Method Works Best
White vinegar’s acetic acid gently dissolves calcium, lime, and other mineral deposits that cause a shower head clog without damaging metal or plastic finishes. It’s non-toxic, inexpensive, and widely available—making it the go-to for anyone wondering how to use vinegar for cleaning even in delicate appliances.
Materials You’ll Need
- White distilled vinegar (at least 1 cup)
- Plastic bag (sandwich or quart-sized)
- Rubber band or twist tie
- Old toothbrush (optional, for light scrubbing)
- Wrench or pliers (only if removing the shower head)
Step-by-step Instructions
For Removable Shower Heads
- Turn off the water supply to your shower.
- Unscrew the shower head by hand or with a wrench (wrap the jaws in cloth to avoid scratches).
- Place the shower head in a bowl or container and submerge it completely in white vinegar.
- Let it soak for 1–4 hours (or overnight for heavy buildup).
- Rinse thoroughly with warm water, then scrub nozzle openings gently with an old toothbrush if needed.
- Reattach the shower head and test water flow.
For Fixed Shower Heads
- Pour enough white vinegar into a plastic bag to fully cover the shower head face.
- Secure the bag around the shower head with a rubber band or twist tie, ensuring all nozzles are immersed.
- Let it hang for 1–2 hours (or up to 4 for severe clogs).
- Remove the bag and discard the vinegar.
- Run hot water through the shower head for 1–2 minutes to flush out loosened debris.
- Use a soft toothbrush to gently clear any remaining residue from the nozzles.
How Long to Expect Results
Most users notice improved water pressure immediately after rinsing. For moderate clogged showerhead issues, full flow often returns within minutes. If your shower head not spraying evenly persists, allow up to 24 hours for residual vinegar to finish dissolving hidden deposits before trying another method.
2. The CLR and Commercial Descaler Approach
When to Choose Commercial Products
Reach for CLR or similar descalers when vinegar fails—especially if you live in an area with extremely hard water or face a clogged shower with visible crusty, chalky buildup. These formulas work faster on tough limescale and are ideal for how to remove buildup from shower head components that vinegar can’t fully penetrate. However, using vinegar in your washing machine can be an excellent preventative measure against buildup, helping to keep it running smoothly over time.
Safety Precautions and Materials
- CLR or Lime-A-Way (or another calcium-lime-rust remover)
- Rubber gloves
- Eye protection
- Well-ventilated area
- Plastic container or spray bottle
- Soft cloth or sponge
Application Process
- Put on gloves and eye protection-these chemicals can irritate skin and eyes.
- For removable shower heads: Submerge in a 1:1 mix of CLR and water for 2–10 minutes (never exceed product instructions).
- For fixed heads: Pour CLR into a spray bottle, mist generously over nozzles, and let sit for 2–5 minutes.
- Rinse thoroughly with cold water for at least 2 minutes to remove all chemical traces.
- Flush the system by running the shower for 1–2 minutes before use.
Eco-friendly Alternative Options
If you prefer to avoid harsh chemicals, try citric acid powder (found in canning aisles) dissolved in warm water-it mimics CLR’s power with a gentler environmental footprint. Use the same soaking method as vinegar, but reduce soak time to 30–60 minutes. This is a smart middle ground for those seeking to clean shower heads effectively without synthetic additives.
Also See: How to Remove Turmeric (Haldi) Stains From Countertops & Clothes
3. The Manual Scrub and Poke Technique
Tools for Stubborn Mineral Deposits
When buildup clings inside tiny nozzles, even soaking may leave residue. This hands-on approach targets each opening directly-perfect for how to unclog showerhead nozzles that still drip unevenly after chemical treatment.
How to Safely Clear Individual Nozzles
Using a Paperclip or Needle
- Straighten a small paperclip or use a sewing needle with a blunt tip.
- Gently insert the tip into each clogged nozzle-never force it.
- Twist slightly to break up internal deposits without scratching the surface.
- Wipe away loosened particles with a damp cloth.
Scrubbing with an Old Toothbrush
- Dip a soft-bristled toothbrush in vinegar or soapy water.
- Scrub the face of the shower head in circular motions, focusing on nozzle rims.
- For rubber nozzles (common in modern heads), simply rub them with your thumb-they’re designed to flex and pop out debris.
- Rinse thoroughly under running water to clear dislodged grit.
Post-cleaning Rinse Process
After poking or scrubbing, run hot water through the shower head for 2–3 minutes. This flushes out any tiny particles shaken loose during manual cleaning. If your goal is to fix a clogged shower head for good, this final rinse ensures no debris re-clogs the system from within. Regular cleaning of the shower area, including the curtains, is essential to prevent mold and mildew buildup. Knowing the best way to remove mold and mildew from shower curtains can make a significant difference in maintaining a fresh, clean bathroom.
4. The Complete Disassembly Method
When Full Disassembly is Necessary
If your shower head still has weak flow after soaking or scrubbing, mineral buildup may be hiding deep inside. Full disassembly is the best way to tackle a stubborn clogged showerhead that’s affecting water pressure across all nozzles. This method is also ideal for older, non-removable models or multi-spray heads where deposits accumulate in internal channels.
Taking Apart Your Shower Head Safely
Before you start, turn off the water and lay down a soft towel to protect finishes. Use the right tools to avoid stripping parts:
- Adjustable wrench or pliers (wrap jaws in cloth to prevent scratches)
- Small screwdriver (for models with faceplate screws)
- Bowl or container to keep tiny parts organized
- Unscrew the shower head from the shower arm by turning counterclockwise.
- If your model has a faceplate, gently remove it with a screwdriver or by hand.
- Separate internal components like flow restrictors, filters, and spray plates. Lay them in order on your towel so you remember how they fit back together.
Deep Cleaning Each Component
Now that everything’s out, give each piece a thorough clean to fully clear clogged shower head channels:
- Soak metal and plastic parts in undiluted white vinegar for 30–60 minutes.
- For rubber nozzles, use a soft toothbrush with baking soda paste to avoid tearing.
- Rinse every component under warm running water, checking that water flows freely through each opening.
- Inspect the flow restrictor-a small disc often found behind the faceplate. If it’s clogged beyond cleaning, consider replacing it rather than removing it (which can increase water use).
Reassembly Tips to Avoid Leaks
Putting it back together correctly ensures no drips or pressure loss:
- Reassemble parts in reverse order, making sure seals and O-rings are seated properly.
- Hand-tighten the shower head onto the arm first, then give a final quarter-turn with a wrench-over-tightening cracks fittings and causes leaks.
- Turn the water back on slowly and check for drips at the connection point.

5. The Baking Soda Power Paste Solution
Creating the Perfect Cleaning Paste
For thick crusty deposits that vinegar alone can’t dissolve, a baking soda paste adds abrasive power without scratching. Mix: Baking soda is essential in many effective cleaning methods, especially for tackling stubborn oven grime. The ultimate guide to cleaning your oven with baking soda and vinegar shows how these two ingredients work together for a sparkling clean finish.
- 3 parts baking soda
- 1 part water (or white vinegar for extra reaction)
Stir until it forms a thick, toothpaste-like consistency. This paste is ideal for how to remove buildup from shower head surfaces and around nozzle edges where scale hardens.
Application for Heavy Buildup
- Apply the paste directly to affected areas using an old toothbrush or cotton swab.
- Let it sit for 15–20 minutes to soften mineral layers.
- Gently scrub in circular motions, focusing on nozzle rims and crevices.
- Rinse thoroughly with warm water until no residue remains.
Combining With Vinegar for Extra Power
For a fizzy, deep-penetrating clean that helps unclog shower head nozzle blockages, apply the baking soda paste first, then spray or pour white vinegar over it. The acid-base reaction bubbles on contact, lifting stubborn deposits. Wait 10 minutes before scrubbing and rinsing. This combo is especially effective for chrome or brass shower heads with heavy lime scale. Regularly addressing hard water buildup can prolong the life of your faucets and shower heads, ensuring they continue to function properly. Techniques for dissolving hard water buildup include using vinegar or specialized descalers that can eliminate mineral deposits efficiently.
The Science Made Simple: Why This Problem Happens
How Hard Water Creates Mineral Buildup
Hard water contains dissolved minerals like calcium and magnesium. When this water evaporates or heats up in your shower, those minerals crystallize into solid deposits. Over time, they narrow or seal off nozzle openings, directly causing shower head not spraying evenly or with full force.
The Role Of Calcium and Lime Deposits
Calcium carbonate-commonly called limescale-is the chalky white or off-white crust you see. It’s insoluble in water, so it sticks stubbornly to metal, plastic, and ceramic surfaces inside your shower head. These deposits accumulate fastest in hot water, which is why showers clog faster than faucets.
Why Some Homes Experience This More Than Others
Water hardness varies by region. Homes drawing from wells or municipal sources in limestone-rich areas (like the Midwest or Southwest U.S.) often have very hard water. The higher the mineral content (measured in grains per gallon), the quicker your shower head will clog. If neighbors complain about filmy dishes or stiff laundry, you’re likely in a high-hardness zone.
5 Habits to Keep Clogs From Coming Back
Weekly Maintenance Routine
- After your last shower of the week, wipe the shower head face with a dry microfiber cloth to prevent water spots from drying into scale.
- Once a week, run hot water through the head for 30 seconds to flush out loose particles before they settle.
Water Softener Solutions for Hard Water Areas
If your home has very hard water, a whole-house water softener exchanges calcium and magnesium ions for sodium or potassium, drastically reducing scale formation. For renters or budget-conscious homeowners, salt-free conditioners or magnetic descalers offer partial protection without plumbing changes.
Installing an Inline Shower Filter
An inline filter screws between the shower arm and head, trapping sediment and reducing chlorine and minerals. Look for models with replaceable cartridges labeled for scale reduction-they’re a simple fix to help clean shower heads stay cleaner longer.
Monthly Deep Cleaning Schedule
- Once a month, soak your shower head in vinegar for 30 minutes-even if pressure seems fine.
- Use a toothbrush to gently scrub around nozzles.
- Rinse well and check spray pattern. Consistency here prevents the need for how to fix a clogged shower head emergencies.
Signs to Watch for Early Intervention
Catching issues early makes cleaning easier. Watch for:
- Uneven spray patterns or drooping streams
- Visible white crust around nozzle tips
- Reduced water pressure compared to other faucets
- Sputtering or spitting when you turn on the shower
At the first sign, a quick vinegar soak can unblock shower head channels before they fully clog. Don’t wait for total blockage-early action saves time and extends your shower head’s life.

Frequently Asked Questions
How Do I Know When It’s Time to Replace My Shower Head Instead Of Cleaning It?
If thorough cleaning doesn’t restore water pressure after multiple attempts, or if you notice visible cracks, corrosion, or broken components, replacement is likely necessary. Persistent leaks or mineral deposits fused into the mechanism are key indicators that cleaning is no longer effective.
Consider the age and cost; if the shower head is over a decade old or repairs exceed the price of a new model, investing in a clog-resistant replacement is more economical. Look for models with rubber jets or anti-clog features if you have hard water.
Are There Any Shower Head Materials That Are Easier to Clean or More Resistant to Clogs?
Shower heads made from stainless steel, chrome-plated brass, or silicone-coated materials are more durable and less prone to mineral buildup than plastic. These surfaces are non-porous, making deposits easier to wipe off without damaging the finish.
Models with self-cleaning rubber nozzles allow you to flex the jets to pop out clogs quickly. Avoid cheap plastic heads in hard water areas, as they degrade faster and trap minerals.
What Should I Do if I Live in a Rental and Can’t Disassemble the Shower Head?
Use non-invasive methods like tying a plastic bag filled with vinegar around the fixed shower head for a soak, or apply a commercial descaling spray without removal. Always check your rental agreement and seek landlord permission before attempting any cleaning to avoid liability. Vinegar is a powerful cleaning agent that can also be used to make an all-purpose cleaning spray. Combining vinegar with water creates an effective solution for tackling various stains and dirt around the home.
For quick fixes, gently scrub exterior nozzles with an old toothbrush and vinegar. If pressure remains low, request maintenance from your landlord, as the issue might be with building pipes.
Can Using a Shower Head Cleaner Damage the Finish or Color Of My Shower Head?
Harsh chemicals like acid-based descalers can strip finishes, cause discoloration, or etch surfaces, especially on painted, oil-rubbed bronze, or colored shower heads. Always test cleaners on a small, hidden area first and follow product instructions.
For sensitive materials, opt for gentle solutions like white vinegar or baking soda paste, and rinse thoroughly after cleaning. Regular wiping with a soft cloth can prevent buildup without risking damage.
Final Words
Your shower head doesn’t have to stay clogged, and better water pressure is just a cleaning session away. Whether you choose the gentle vinegar soak, the powerful commercial descaler route, or the thorough disassembly method, you now have proven techniques that actually work. The key is selecting the right approach based on your specific buildup level and shower head type.
Start with the simplest method first-most mineral clogs respond beautifully to a basic white vinegar overnight soak. If that doesn’t restore your water pressure completely, move up to the more intensive techniques we’ve covered. Remember, regular maintenance beats major deep cleans every time.
Ready to transform your daily shower experience? Pick your preferred method and give it a try this weekend. For more practical home solutions and maintenance tips that actually work, check out Savvy Dwelling where we share research-backed advice to keep your home running smoothly. Your future self will thank you for that powerful, refreshing shower flow.

